As an Azure Stack cloud administrator, you can create offers that let your users (tenants) create SQL databases that they can use with their cloud-native apps, websites, and workloads. By providing these custom, on-demand, cloud-based databases to your users, you can save them time and resources.
LAB : Azure Stack – Make SQL Databases Available To Tenants
SQL Server Resource Provider Adapter architecture
The resource provider is not based on, nor does it offer all the database management capabilities of Azure SQL Database. For example, elastic database pools and the ability to dial database performance up and down automatically aren’t available. However, the resource provider does support similar create, read, update, and delete (CRUD) operations.
The resource provider is made up of three components:
- The SQL resource provider adapter VM, which is a Windows virtual machine running the provider services.
- The resource provider itself, which processes provisioning requests and exposes database resources.
- Servers that host SQL Server, which provide capacity for databases, called Hosting Servers.
Azure Stack Development Kit no longer creates an SQL instance. You must create one (or more) and/or provide access to external SQL instances. There are a number of options available to you including templates in the Azure Stack Quickstart Gallery and Marketplace items.
Tasks covered :-
- Deploy the SQL Server resource provider
- Create an offer
- Test the offer
Exercise 1 : Deploy the SQL Server resource provider
Task 1 : Deploy the SQL resource provider
- If you have not already done so, register your development kit and download the Windows Server 2016 EVAL image downloadable through Marketplace Management. You can also use a script to create a Windows Server 2016 image. The .NET 3.5 runtime is no longer required.
- Download the SQL resource provider binaries file (AzureStack.Sql.1.0.923.0.exe) and extract it on the development kit host.
In this lab, we have downloaded to C:\SQL-RP-Binaries\
- The Azure Stack root certificate is retrieved and a self-signed certificate is created as part of the script based deployment later.
Optional: If you need to provide your own, prepare the certificates and copy to a local directory if you wish to customize the certificates (passed to the installation script). You need the following certificates:
- A wildcard certificate for *.dbadapter.<region>.<external fqdn>. This certificate must be trusted, such as would be issued by a certificate authority (that is, the chain of trust must exist without requiring intermediate certificates.) (A single site certificate can be used with the explicit VM name you provide during install.)
- The root certificate used by the Azure Resource Manager for your instance of Azure Stack. If it is not found, the root certificate will be retrieved.
The script performs these steps:
- If necessary, download a compatible version of Azure PowerShell.
- Upload the certificates and other artifacts to a storage account on your Azure Stack.
- Publish gallery packages so that you can deploy SQL databases through the gallery.
- Deploy a VM using the Windows Server 2016 image created in step 1 and install the resource provider.
- Register a local DNS record that maps to your resource provider VM.
- Register your resource provider with the local Azure Resource Manager (Tenant and Admin).
NOTE
If the installation takes more than 90 minutes, it may fail and you see a failure message on the screen and in the log file, but the deployment is retried from the failing step. Systems that do not meet the recommended memory and core specifications may not be able to deploy the SQL RP.
Here’s an example you can run from the PowerShell prompt (but change the account information and portal endpoints as needed):
# Install the AzureRM.Bootstrapper module
Install-Module -Name AzureRm.BootStrapper -Force
# Installs and imports the API Version Profile required by Azure Stack into the current PowerShell session.
Use-AzureRmProfile -Profile 2017-03-09-profile
Install-Module -Name AzureStack -RequiredVersion 1.2.10 -Force
# Download the Azure Stack Tools from GitHub and set the environment
cd c:\
Invoke-Webrequest https://github.com/Azure/AzureStack-Tools/archive/master.zip -OutFile master.zip
Expand-Archive master.zip -DestinationPath . -Force
# This endpoint may be different for your installation
Import-Module C:\AzureStack-Tools-master\Connect\AzureStack.Connect.psm1
Add-AzureRmEnvironment -Name AzureStackAdmin -ArmEndpoint “https://adminmanagement.local.azurestack.external”
# For ADFS, use the following
$tenantID = Get-AzsDirectoryTenantID -ADFS -EnvironmentName AzureStackAdmin
$vmLocalAdminPass = ConvertTo-SecureString “Pa55w.rd1234” -AsPlainText -Force
$vmLocalAdminCreds = New-Object System.Management.Automation.PSCredential (“sqlrpadmin”, $vmLocalAdminPass)
$AdminPass = ConvertTo-SecureString “Pa55w.rd1234” -AsPlainText -Force
$AdminCreds = New-Object System.Management.Automation.PSCredential (“azurestackadmin@azurestack.local”, $AdminPass)
# Change this as appropriate
$PfxPass = ConvertTo-SecureString “Pa55w.rd1234” -AsPlainText -Force
# Change directory to the folder where you extracted the installation files
and adjust the endpoints
C:\SQL-RP-Binaries\DeploySQLProvider.ps1 -DirectoryTenantID $tenantID `
-AzCredential $AdminCreds -VMLocalCredential $vmLocalAdminCreds `
-ResourceGroupName “SqlRPRG” -VmName “SqlVM” `
-ArmEndpoint “https://adminmanagement.local.azurestack.external” ‘
-TenantArmEndpoint https://management.local.azurestack.external `
-DefaultSSLCertificatePassword $PfxPass
DeploySqlProvider.ps1 parameters
You can specify these parameters in the command line. If you do not, or any parameter validation fails, you are prompted to provide the required ones.
| Parameter Name | Description | Comment or Default Value |
| DirectoryTenantID | The Azure or ADFS Directory ID (guid). | required |
| AzCredential | Provide the credentials for the Azure Stack Service Admin account. You must use the same credentials as you used for deploying Azure Stack). | required |
| VMLocalCredential | Define the credentials for the local administrator account of the SQL resource provider VM. This password is also used for the SQL sa account. | required |
| ResourceGroupName | Define a name for a Resource Group in which items created by this script will be stored. For example, SqlRPRG. | required |
| VmName | Define the name of the virtual machine on which to install the resource provider. For example, SqlVM. | required |
| DependencyFilesLocalPath | Your certificate files must be placed in this directory as well. | optional |
| DefaultSSLCertificatePassword | The password for the .pfx certificate | required |
| MaxRetryCount | Define how many times you want to retry each operation if there is a failure. | 2 |
| RetryDuration | Define the timeout between retries, in seconds. | 120 |
| Uninstall | Remove the resource provider and all associated resources (see notes below) | No |
| DebugMode | Prevents automatic cleanup on failure | No |
Task 2 : Verify the deployment
- Access the Azure Stack administrator portal at https://adminportal.local.azurestack.external and sign in as :-
Username : azurestackadmin@azurestack.local
Password : Pa55w.rd1234
- Verify that the deployment succeeded.
Click Resource Groups > click the resource group you used, SqlRPRG, and then make sure that the essentials part of the blade (upper half) reads date (Succeeded).

Task 3 : Provide capacity by connecting to a hosting SQL server
- Access the Azure Stack administrator portal at https://adminportal.local.azurestack.external and sign in as :-
Username : azurestackadmin@azurestack.local
Password : Pa55w.rd1234
- Create an SQL virtual machine, unless you have one already available. Marketplace Management offers some options for deploying SQL VMs.
- Click Resource Providers > SQLAdapter > Hosting Servers > +Add.
The SQL Hosting Servers blade is where you can connect the SQL Server Resource Provider to actual instances of SQL Server that serve as the resource provider’s backend.

- Fill the form with the connection details of your SQL Server instance.

NOTE
As long as the SQL instance can be accessed by the tenant and admin Azure Resource Manager, it can be placed under control of the resource provider. The SQL instance must be allocated exclusively to the RP.
- As you add servers, you must assign them to a new or existing SKU to differentiate service offerings. For example, you could have a SQL Enterprise instance providing database capacity and automatic backup, reserve high-performance servers for individual departments, etc. The SKU name should reflect the properties so that tenants can place their databases appropriately and all hosting servers in a SKU should have the same capabilities.
An example:
NOTE
SKUs can take up to an hour to be visible in the portal. You cannot create a database until the SKU is created.
Task 4 : Create Your First SQL Database to Test the Deployment
- Sign in to the Azure Stack admin portal as service admin.
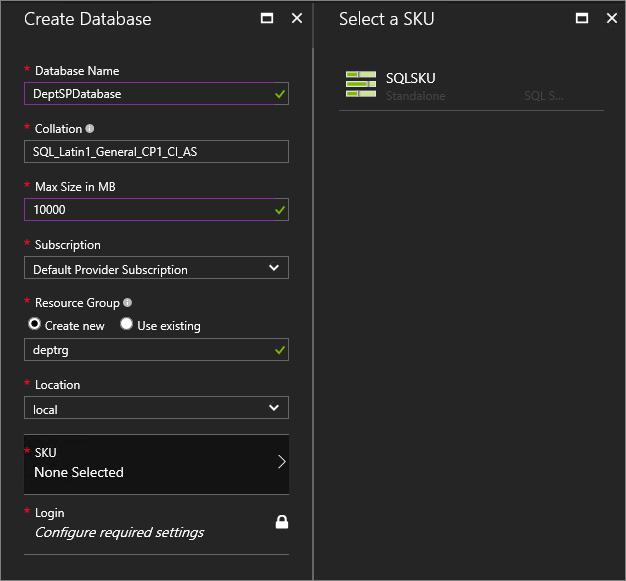
- Click + New > Data + Storage > SQL Server Database (preview) > Add.
- Fill in the form with database details, including a Database Name, Maximum Size, and change the other parameters as necessary. You are asked to pick a SKU for your database. As hosting servers are added, they are assigned an SKU and databases are created in that pool of hosting servers that make up the SKU.
- Fill in the Login Settings: Database login, and Password. This is a SQL Authentication credential that is created for your access to this database only. The login user name must be globally unique. Either create a new login setting or select an existing one. You can reuse login settings for other databases using the same SKU.

- Submit the form and wait for the deployment to complete.
In the resulting blade, notice the “Connection string” field. You can use that string in any application that requires SQL Server access (for example, a web app) in your Azure Stack

Task 5 : Add capacity
Add capacity by adding additional SQL hosts in the Azure Stack portal and associate them with an appropriate SKU.
- If you wish to use another instance of SQL instead of the one installed on the provider VM, click Resource Providers > SQLAdapter > SQL Hosting Servers > +Add.
Exercise 2 : Create an offer
- Set a quota and name it SQLServerQuota. Select Microsoft.SQLAdapter for the Namespace field.
- Create a plan. Name it Databases, select the Microsoft.SQLAdapter service, and SQLServerQuota quota.
- Create an offer, name it TestSQLServerOffer and select the TestSQLServerPlan plan.

Exercise 3 : Test the offer
Now that you’ve deployed the SQL Server resource provider and created an offer, you can sign in as a user, subscribe to the offer, and create a database.
- Sign in to the Azure Stack portal (https://portal.local.azurestack.external) as a tenant.
- Click Get a subscription and then type TestSQLServerSubscription under Display Name.
- Click Select an offer > TestSQLServerOffer > Create.
- Click More services > Subscriptions > TestSQLServerSubscription > Resource providers.
- Click Register next to the Microsoft.SQLAdapter provider.
- Create a SQL database
Click +New > Data + Storage > SQL Database.
Leave the defaults for the fields, or you can use these examples:
- Database Name: SQLdb
- Max Size in MB: 100
- Subscription: TestSQLOffer
- Resource Group: SQL-RG
- Click Login Settings, enter credentials for the database, and then click OK.
- Click SKU > select the SQL SKU that you created for the SQL Hosting Server > OK.
- Click Create.
END LAB